SEO Guide to Changing your Webiste's Domain
Recently, many of our clients have been getting creative and really branding their businesses and their websites for the future, establishing the foundation for building their brand online. Unfortunately, this can be a giant headache for webmasters and SEO’s. It is critical from a SEO standpoint that we understand where to start, and further more, make sure you do all the right things at the right time. Since we’ve had such so much experience with this very task lately, I wanted to make a guide to help you through the process. This process is outlined for having your two domains hosted individually, and aims to present the easiest way to go about changing your domain from one to another.
Step 1: Define Your Goals
To have a headache-less transfer of a website you want to make sure you properly define your goals. For example you want to make oldsite.com become newawesomeness.com, it will be very important throughout this process to keep this goal in mind and know the two site’s identities. It can be very easy to make wrong moves if you don’t establish your current domain and it’s extensions from you desired domain and your new extensions. Just keep the end goal in mind and this will be a simple, seamless process.
Step 2: Redirect Like a Boss
 Best practice all around for SEO is to make sure you have continuity to your website and you avoid the dreaded 404 errors using 301 redirects. This helps ensure that any inbound links you may have to a given page are redirected to the new content or a relevant page. Instead of a user landing on a dead page, you create a good user experience while retaining your links you may have earned. 301 redirects are an SEO’s best friend and should be a common practice to anyone managing a website. If you need a bit of background information on redirect and what exactly 301 redirects are SEOmoz has a rather informative redirection page.
While changing your websites domain you will want to make sure to redirect all of your content to the relevant pages on the new site. You must do this BEFORE forwarding your old domain to the new one. Also, this process may create a little down time for the site depending how many webpages you have and how long this process takes. Often if you are not building anything new you will just be redirecting that domain’s pages to the new domain with the same content. For example oldsite.com/we-love-seo should redirect to newawesomeness.com/we-love-seo. This redirect would be done on oldsite.com redirecting to newawesomeness.com. If you are also doing a redesign, it may be easier to do the domain change and then implement the changes to the design and content, just for simplicity sake. All of your 301 redirects should be a one-to-one match from the old domain to the new domain, otherwise you might want to double check and make sure you didn’t miss anything.
Taking the time to redirect your content properly will have a huge payoff in the long run for the users and especially to not lose any SEO value you may have already established.
**If you are looking for some simpler way to find all of your pages on your website you can either use Google Webmaster Tools and see all your internal links(all of the indexed content by Google) or use a tool like Screaming Frog that will crawl your website and produce a report that can be exported.
Step 3: Webmaster Tools – Using the Toolbox
Once you have all of your redirects to your individual pages finished, and your new domain set up, create a Google Webmasters account for your new site. You will be doing a formal Change of Address through Google Webmaster Tools. The change of address can only be done if you have access to both (old site and new site) Webmaster accounts. This tells Google that you are changing your address and can expect the change in addition to the similar content.
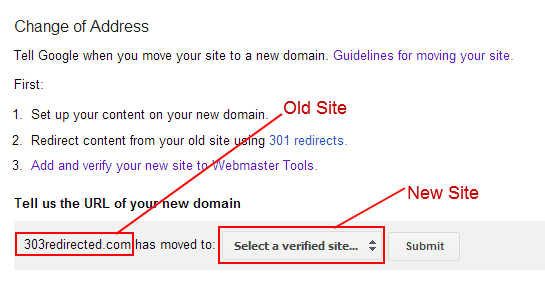
The is the screen you will use to submit the change of address it is fairly straightforward, the change of address should be submitted from the old site’s Webmaster account.
Step 4: Internal and External Absolute Link Changes
Almost there, this is the final step in the process. Making sure your website has updated links, not only internally but also as many of the inbound links you can get updated will greatly help. Making sure your internal links, if they are absolute(i.e. http://oldsite.com/matt-green-is-my-hero instead of /matt-green-is-my-hero), are updated will help to avoid excess redirecting and any confusion from the user. Updating links will also help Google index everything quickly and properly for your website. You can also do this step earlier in the process if desired or convenient but is often finished after all of the redirecting and forwarding has been completed.
Branded Happy Camper
Using these steps and this guide will help to get quick SEO results when doing a change of domain from one to another. Google states in its guidelines to keep the old site active for 180 days after completing the change of address submission and redirecting process. After that point you can decommission that website and continue business with your new branded look.