Using Lastpass for Easy Citation Building: Local SEO
Building citations for local SEO is an important task that everyone involved in local SEO needs to be aware of. Not only do you need to build strong citations, you also need to make sure they’re 100% correct when you’re building them. Creating inconsistencies in the data by using incorrect information can create a real local ecosystem nightmare. The other major downside of building citations is just how tedious the work really is.

Previously I used to use Roboform to expedite this process and wrote a guide about how to find and build citations on the Moz.com blog. However I have found that Lastpass is a bit easier to use and also not as bulky which is really nice. It has a simple browser plugin for all of the major internet browsers including Chrome, Firefox, and Internet Explorer.
According to their website the product was made to “remember your passwords so that you can focus on the more important things in life.”. But the tool is much more powerful than just remembering passwords (which of course is also very handy). We can program Lastpass to autofill all of the fields we need to build citations easily and save a ton of time.
In a nutshell all you’ll have to do is find the registration page of the citation you’re trying to build and click the proper button, give it a quick manual review, and then submit it.
The Benefits of using Lastpass for Citation Building
- Manage multiple clients easily through the program. You can easily switch between clients and locations to add citations fast.
- Ensure 100% NAP Consistency with little effort
- Save a lot of time by auto filling the forms
- Keep citation login username and password information the same across all websites
- This can be used to add new citations or fix existing ones if you have the login information
I have outlined how you can use this method in an easy to use step by step guide below:
- First if you don’t already have it, start by Downloading Lastpass from their website here.
- Once you have downloaded the software go ahead and install it in the browsers you use most frequently.
- Create an account and remember your primary login information. If you want to keep everything under one account consider signing up for an enterprise account with multiple users or just use one central login for all citation building. Make sure to create the account through the software itself and not online.
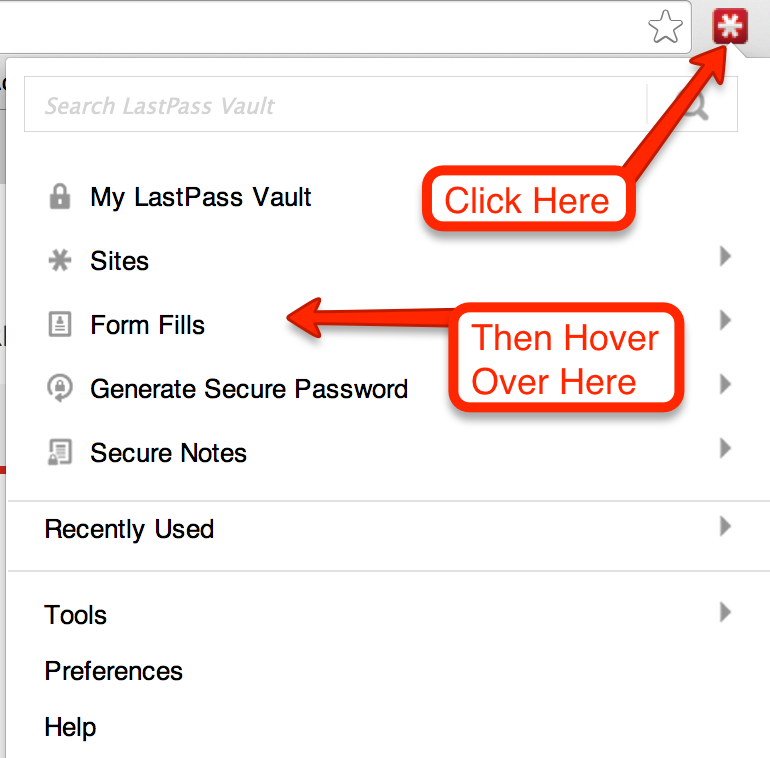
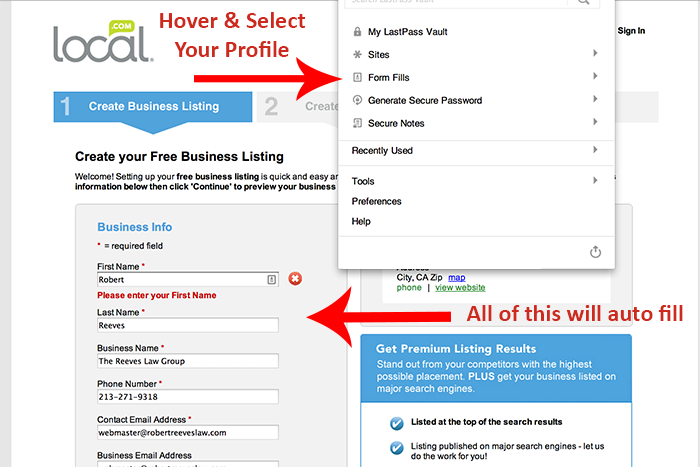
- Once you have your account setup we can dive right into the meat of it. Start by clicking on the lastpass icon in the upper right corner of your browser and hover over the Form Fills Tab as shown below.
- From the Form Fills menu select the option to Add a new Profile. You will create a new profile for each client location you want to manage through Lastpass.
- The first step once you get to the screen below is to fill out the profile name. I suggest naming this as something descriptive to you can easily refer to it in the future. I usually add a short business name and city for easy reference. For example if the client you’re working with is Balanced Professional Massage Therapy based out of Whittier, CA I might name it as Balanced Massage Whittier. If the client has multiple locations it gets easier to manage this way as well as you can easily see the location identifier in the drop down menu. Next we have to fill out every field on this profile.
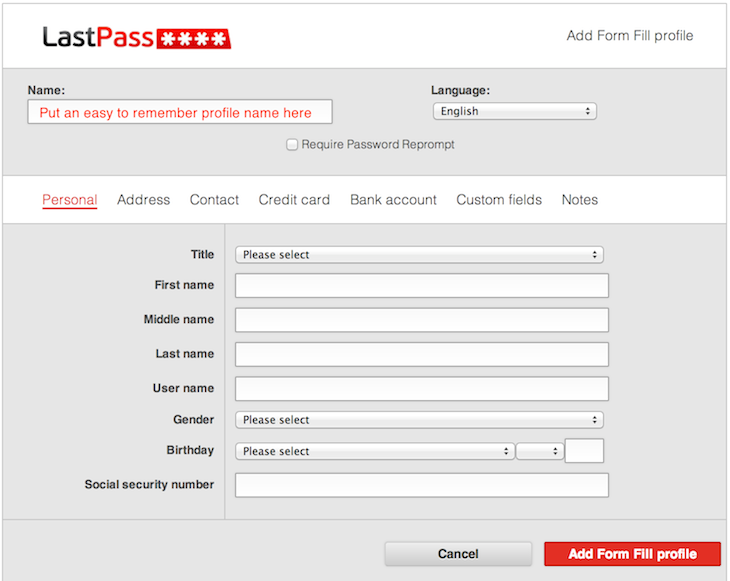 Filling this out 100% will save lots of time so it’s important that you can get this information from the client in your client intake form. Each citation source requires different information and keeping it 100% consistent is key.
The Personal Tab – What to Fill Out
Title – Mr., Ms., etc.
First Name – Use the business owners first name
Middle Name – Use the business owners middle name
Last Name – Use the business owners last name
Username – Pick a username you want to use for all of the logins. I suggest picking something unique that would not be taken so you don’t have to mess with existing username conflicts. One example might be; Blanced199245
Gender – Yes some actually ask for this too
Birthday – I suggest using the real birthday - The next tab we have to fill out is the address tab shown below:
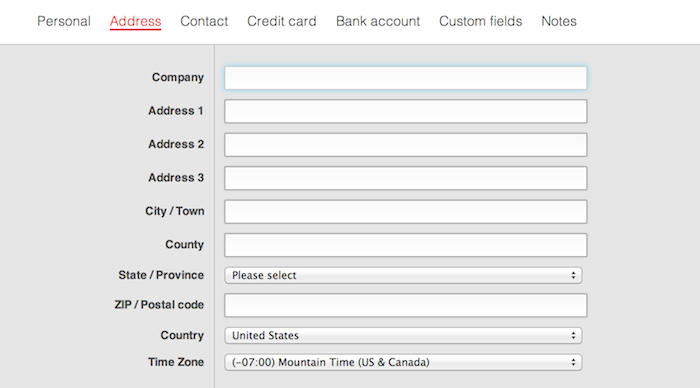 Company – This will be your company name listed in your Google My Business Profile
Address Line 1 – This is where your main address should go EXCLUDING your’e suite number
Address Line 2 – This is where your suite or building number should go.
Address Line 3 – This is typically not used
City / Town – This is the city for your business NAP
County – This is used in some sources so make sure to add your county here
State – Your Google My Business State
Zip – Your 5 digit zipcode
Country – Your Country - Next we can move onto the third tab, the contact tab. On this tab we only need to fill out three pieces of information typically. This will include the following:Phone Number – This is your LOCAL business phone number for this location. Not toll free or 800 number.
Email Address – The email address you will use to register and create these citations. Many people choose to use a separate email address for citation emails to ensure their inbox does not get full of crap. More on this later.
Fax Number – If you have an active fax number enter it here.
- We can skip the bank account and credit card tabs as they’re rarely used. If you are going to engage in any paid citations though it may be worth it to fill these out.
- The next tab we are going to work on is the most important tab. The Custom tab. In the custom tab we can separate common citation site language and create custom auto fill fields. For example some citation sites ask what year your business was founded so I can create this field and have it auto fill. Below is a list of common custom fields I create that have made my life much easier when building manual citations. Remember to put each variant on a separate line in the “Text to Find” column. You will but the answer in the “Value to Fill Column on the right”. I have shown this in the graphic below.
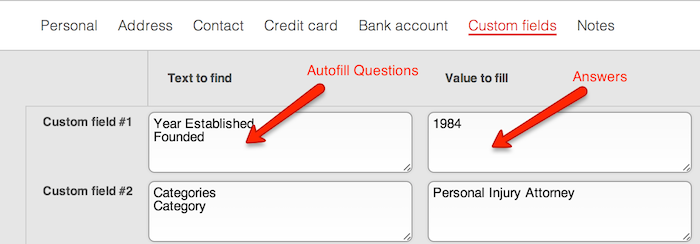 Below is a list of the fields I typically use. I have separated the “Text To Find” Options by comma. You will want to do this by line.Year Established, Founded – Put the year the business was founded in the value to fill box
Categories, Category, Business Category – Put the primary and most common business category here
Business Name – Just another variant of company name
Password, Re-type Password – Enter your password you want to register your account with here
Business Website, Website – Enter the URL of your website landing page here
800 Phone Number, Toll Free Number – Enter your toll free 800 number if applicable here
Business Overview, Description, Long Description – Enter the long description for your business here
Short Description – Enter the short description for your business here
Bio, Biography – Enter the founder’s biography here.
Business Fax Number – Add your Business Fax Number here - Now that we have all of our information entered for this location go ahead and save your profile by clicking the Save Form Fill Profile button. Keep in mind you can add any other fields that are important for your niche.
Now That We’re All Setup Let’s Go Over a Couple of Ground Rules
Adding citations is an important part of local SEO. Even though adding citations is important, it can also be dangerous if you’re creating duplicates. If you haven’t already read my guide on finding and fixing duplicate citations, do that before adding any new citations.
Before using this powerful tool create a list of the citation sources you want to submit your business to. If you’re a new business you don’t have as much to worry about as there shouldn’t be any duplicate citations that already exist. Once you have your list read you can go ahead and get started.
Now Lets Walk Through a Simple Example
Using this new tool is easy once it’s all setup. To use it simply visit the registration page where you can add your business listing like Local.com. Once you’re here you will notice the form of information you have to fill out.
If you click on the local link above it will open the window shown below. Once you have your browser window open you should see the red lastpass icon in the upper right corner of your browser. Click this, scroll down to form fills, and select the profile you want to build citations for. That’s it. Lastpass will automatically fill out all of these fields and you will just have to manually check them and press submit.
Some Important Things To Remember
This is a super powerful tool that can save a lot of time, especially if you’ve already curated your citation building list with the submit URL’s. As I mentioned above, please be careful and do your due diligence first. Ensure you are not creating a duplicate citation before you add a new one. Additionally please make sure to manually check that everything was filled out correctly. Sometimes things get misplaced or put in the wrong field. Check it out and be sure everything is legit before submitting it. Also I have seen some quirks where some submit forms don’t detect that the fields have been inputted. If you run into this simply start at the top field and hit the tab key to tab through the form. Once you get through it all fields should register.
I hope you found this guide useful and if you have any insights on how to improve this process please let me know. Additionally if you found it helpful please share it with your friends or those who might be interested in further automating their citation building process.