How to Setup Google Analytics Goal Tracking
Google Analytics goal tracking is a must(I would double underline if I could) if you rely on your website to generate leads. Goal tracking will help you understand where your conversions are coming from in terms of geography, source, what path to conversion. and so much more. I will be writing follow up posts on how to use the goal tracking to better target your marketing efforts, but for now, let’s tackle setting up goals in Google Analytics (GA).
Prerequisites for Setup
There are only two things you need to to set up goal tracking in GA:
- Google Analytics setup and tracking. Sign up here
- Some form of conversion(contact form, checkout etc.)
If you do not have these setup make sure to get them done before continuing.
1. Navigating to Your Website Goals
If you are unfamiliar with the Google Analytics dashboard follow the below steps to get to your goal setup screen. If you are already a Jedi with Google Analytics, just skip to step #2.
First, if you have multiple site,s click on the site you want to setup your goals on. After you get to the dashboard for that site, click Admin at the top of the dashboard (marked in red). Once you click, your screen should look some thing like this:![]()
Once you are on the screen click on “Goals” marked in blue. Boom! Now you should be on your website’s goal page.
Google allows you to have up to 20 goals for each website. Most websites will not have that many, but if needed they can be edited or removed at any time. If you are like me and don’t have goals set up yet. click on the “+ New Goal” button at the top left of the dashboard (marked in green).

At this point you are ready to decide what type of goal you need to set up.
2. What Goal Type Should I Use?
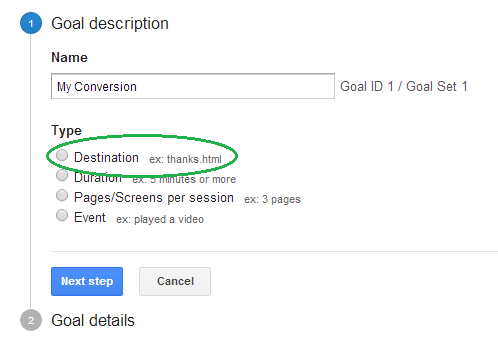
Deciding what goal you need in Google Analytics depends entirely on what you would like to track. The most common goal type is “Destination”. Below I’ve broken down what each goal type is commonly used for and how to use them to track conversions. I will be using the destination goal tracking to finish our set up, since it is the most common type.
To continue setting up your goals select “Destination”.

Destination Goal Tracking
Most websites, including eCommerce sites, will use destination goal tracking in Google Analytics. If you have ever ordered something online you’ve probably seen a “thank you” or completed checkout page. This is a great example of destination goal tracking.
In order to set this up you will either need to create a page (if you don’t already have one) to be severed up after a user completes your conversion action. Again, this may vary from a complete checkout process to just a simple contact form that redirects to this page. For simplicity I’m just going to call this page my “thank you” page.
Once you have created your “thank you” page, make sure it IS NOT indexed in search engines and cannot be navigated to in any other way, including via your sitemap. This will affect the accuracy of your goal tracking data.
To finish your goal tracking put your “thank you” page URL into the destination field with the default selection of “equals to”. Make sure you put the entire URL if you are tracking a webpage, otherwise your goal tracking will not work. The example is below:
![]()
One you have entered this page and you are sure that your form or checkout redirects to it, you are done and can save your goal. However, you may notice two more options below setting the destination URL. These options are for setting a monetary fixed value per conversion, this might be used if you are only selling one product or a fixed price service. The other option is specifically for tracking a conversion funnel. If you are interested in tracking a specific path of conversion this is an option you will want to check.
**For any eCommerce websites make sure your “eCommerce tracking” is activated in the “Settings” section of your Google Analytics view. This will be far more accurate to track your revenue being generated.
Goal Funnel Tracking
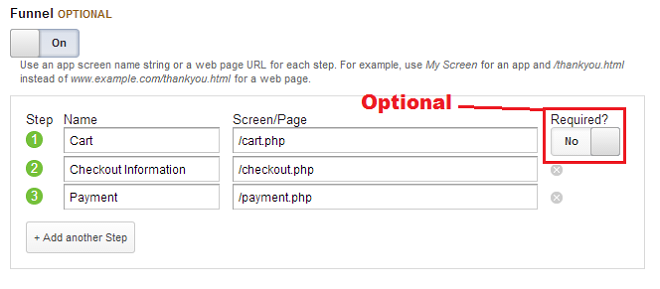
If you decided to check this option, you should have a defined path visitors take to convert like an eCommerce checkout. Having a conversion funnel is becoming more and more common with user friendly websites. These sites are typically built to create these funnels and it is good to track them to identify if users are dropping off too quickly because the process is too long before conversion. This can be an invaluable metric for eCommerce websites. Follow the three steps below to create your conversion funnel tracking.
- Identify the pages in your funnel, preferably in sequential order, and copy their URLs. Again, make sure these pages are not navigable except through the funnel you have created otherwise it could cause data inaccuracies.
- Take these URLs in the process and give each and easy to understand name like our example below.
- Input your information in the order of your goal funnel.
Your funnel set up should look something like this:

You may notice the “required” box to the right. This would require these steps to be completed in order to track the destination conversion. In most cases you can select this; however, if there is any way for your users to convert without going through the funnel, leave this unchecked to make sure you are tracking all conversions.
For this portion of the setup you may use full URLs or just the path. Since this can be a confusing item to setup, if you have any complications because of your website platform or URLs feel free to leave a comment and we will help you through this process.
Duration Goal Tracking
This is a good metric for a website looking to track time on site. A common implementation of this might be a social network or community website that is looking to track how long visitors are on their domain. These metrics are often important to track for advertisers and as a metric to be improved on. This is very seldom tracked for other websites because there is eventually an end all be all conversion for products and services.
Pages/Screen Per Session Goal Tracking
Tracking the pages per visit is a good metric if you are using advertising on your website and are looking for a specific amount of pages to be viewed. By setting this you can create impression analytics for your advertising and help your advertisers understand how engaged a user is on the website. You can see your average pages viewed by visitors in your main dashboard. This goal would only be set if you had a specific mark you are looking to reach per visit that would be a “conversion” for the site.
Event Goal Tracking
Event goal tracking has endless uses and can replace destination tracking in many cases. For most websites event tracking will require additional development to track specific events. If you are unfamiliar with event goal tracking consult and expert to help you create these goals. Practical uses of event tracking includes very specific user actions like playing a video on the website or downloading a document/application. This is very useful for websites who have free software downloads.
Congratulations, You’re Done!
Now that you have learned about goal tracking and hopefully successfully implemented it, you are a goal tracking Jedi. I recommended that you run a test with your goals to make sure the conversions are being tracked. A warning: this tracking will not be instant and will take at least a day to be tracked in the Google Analytics Dashboard.
To see your conversions go to the bottom left of your analytics reporting and click conversions>goals. Happy Tracking!![]()