
Wordpress is a CMS, or a content management system. In other words, it is an easy way to manage all the different working parts of a website, and we prefer to work within WordPress for many reasons.
Why do we choose to use WordPress?
WordPress is used by 23.3% of all the websites. That is a content management system market share of 61.0% (source). In most instances, we try to move clients to WordPress. Why? It is a simple to use, robust CMS that a large percentage of developers, agencies, people and search engines have seen before. Search engines know and trust WordPress as a CMS, and there is also a heap of WordPress plugins already built (keep in mind that the goal is to use as few plugins as possible).
Maybe the most beneficial reason to using WordPress, however, is the amount of troubleshooting information available online. If you are experiencing a specific issue, chances are someone else has already experienced the same issue and asked the question online. This helps to keep the time spent on problems that inevitably arise, and their associated costs, more manageable. For more information on how to best use WordPress for SEO, read these resources:
Jump to:
WordPress Installation
During installation you have a choice with most web hosting companies. You can either do the one-click installation (boooo!) or install WordPress the old fashion way (yayyy!). Often, choosing the “one click” install actually adds unneeded files and code to your WordPress installation. You will see a trend throughout this post which is “less is more”. In order to have the least imperfect website (the goal of technical SEO) it is critical that you take the time to install and configure your WordPress site properly.
If you’re reading this to learn how to install WordPress for your new website AWESOME! But read the security section below before finishing your installation.
Hosting & Domain
First you need to make sure you have your domain pointed at your hosting. This process tends to vary depending on your specific host and domain registry. I’m not going to go in-depth into this; if you need help feel free to email or call your hosting support; they are normally pretty good about getting these things squared away. If you do not have hosting, we suggest using Bluehost (*affiliate link). The number one reason we suggest using Bluehost is that their support is consistently speedy and highly useful.
Download WordPress & Upload Files
Now for the real work. Go to wordpress.org/download to get the latest version of WordPress.
Once you have the zip file downloaded, unzip the files and upload all of the files to the root of your FTP for the website you want WordPress to be installed on. Once you have your file uploaded, now you are read for your database. If you don’t know what FTP is or how to use it, continue with the steps in part two otherwise skip to part three.
What is FTP
FTP is File Transfer Protocol. This is what is used to put files onto your hosting server. In many cases this information is emailed to you once signing up for hosting. If it isn’t then follow the steps below.
Find/create your FTP
Most WordPress hosts have a control panel where you will find your FTP information. However, you should know it will be a different process for hosts like GoDaddy or MediaTemple.
Log into your cPanel or hosting; it may be the same thing. Once logged in look for the icon below and click it, normally it’s under the tab “File Management”.

Follow the steps to create a new FTP log in. Make sure that you have access to the root of the FTP and do not create a new folder for the user. I normally recommend copying your credentials because you will need this information shortly. Congratulations! You just created a FTP log in and now have your credentials.
Download an FTP Program
Once you have your FTP credentials, now you need a place to use them. I highly recommend FileZilla and I use this daily. Go ahead and download this for your system and open the application on your computer. Open FileZilla and do the following:
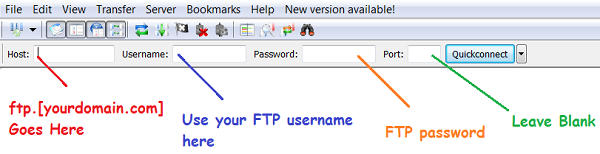
And BOOM your into your FTP! Now, find the root and download the WordPress files into your website’s root. Normally the root is a file called “www” or is labeled for your domain. Once you have completed your file loading, continue to step three.
Create a Database
Log into your cPanel or hosting and create a new database. Normally, you will see and icon like the one below.
![]()
Click on this icon and create a new database and database user. I recommend that you use the password generator. This will not be a password you need to remember after you get it installed. Make sure you copy your FULL database name, FULL username and password. The full database name and user will look something like this:
- DB name: mydatabaseprefix_the-database-name
- DB username: mydatabaseprefix_my-username
The last step to doing this is to add your user to your new database. There is an option at the bottom of the MySQL page that will allow you to do this. Make sure to give all privileges to your user otherwise your install will not work at the completion of these steps.
Now that you have a database for your WordPress installation, continue to the next step.
Four: Complete your wp-config File
Please look at the below security tips before completing this step. It will help secure your WordPress installation further.
Almost there! To complete the WordPress installation process go to your files you just uploaded and find one labeled “wp-config-sample.php”. Open this file and fill out the fields below. Don’t forget to consult the security tips for table prefixes while doing this.
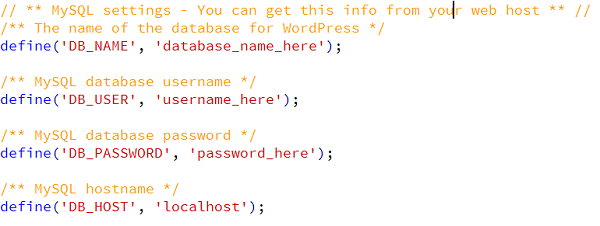
Fill out the fields with the information you have from the database you just created. This is pretty self explanatory; however, in some cases you may need to change your DB_Host from “local host” to something else. In most cases the web host will tell you this while creating the database or when hosting is purchased in a log in email.
Now for the Easy Part
Whew! Now navigate to your new website domain and follow the WordPress prompts. Again make sure to reference the security tips while doing this part of the installation.
Easily Increasing WordPress Security with 3 Steps
An often over looked portion of the WordPress installation process are some easy security measures you can take. Making your website more secure from intrusion or hackers is always a good idea. Below are two smaller items that will help you make your WordPress installation more secure.
1)Change your Table Prefix
When you install WordPress, by default, it uses the table prefix in your database “wp_”. You can change this to any prefix. This can be a good way to organize multiple installations, but it will help secure your site by changing it to something other than the default.
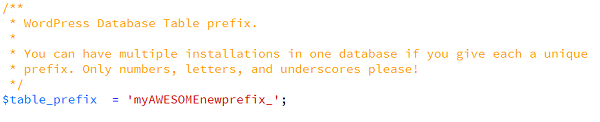
The table prefixes can be found in the wp-config.php folder and is recommended for new installs. DO NOT just change the prefix in an existing installation because you will also need to change the existing installation’s table prefixes. WPbeginner has a good post on how to change existing prefixes, you can find that information here. I have used this before and had success on existing installations that use the default prefix.
2)Don’t use “admin” as a log in name
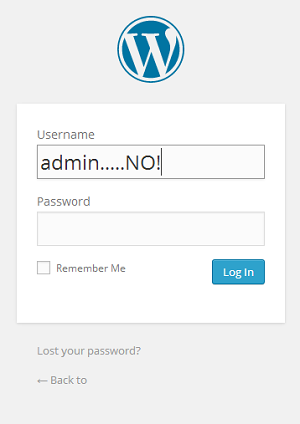 Another way to easily increase your security is to not use or discontinue use of any WordPress users with the username “admin”. Too many times have I seen websites get hacked because they use “admin” and have a weak password. By using the username “admin” this gives a hacker half the information they need because they don’t need to find out the username, just the password. If you are using this as a log in I highly suggest making a more unique username.
WordPress is great at avoiding this because you can easily have multiple users and log ins for anyone working with the site and they can all be unique.
3)Plugins: Less is More
This is easily one of my biggest pet peeves with most WordPress websites, and actually ties into the security of your website also: having too many plugins. Many web developers use plugins to give a site more functionality, but you need to weigh the benefits and detriments to having plugins. Here are the facts:
- Site Performance: Having more plugins often increases the site speed because of the references and the often sloppy code of the plugins. In some cases, just having them active on the site increases page speed and causes site performance to suffer because they have their script or code on each page, even though it may not be in use.
- Conflicting Code: If you have a bunch of plugins on your site that are needed, be careful. When plugins update there is a chance that they will conflict with one another. Depending on the plugin and the conflict of code this can actually break a website front end. It is best to try and minimize these conflicts for a site’s longevity.
- Site Security: Security issues can arise from plugins, especially if you have many that are inactive on your site. There are two things to know: The first is that every plugin has access to your website or at least a portion of it, so make sure to pick trusted plugins. Second any plugins you are not actively using, get rid of. This is another potential point of intrusion if the plugin for any reason gets hacked or is used to gain access to your site. When removing plugins be very careful with any caching plugins; this point is elaborated upon a little further down this page.
The bottom line of all of this is less is more. Make sure to manage your plugins carefully. I too use plugins but a good general rule is that most websites don’t need more than 10 plugins. If you have a personal blog, you should be in the single digits. I have a few of my own recommendations for plugins in the below points.
WordPress Usage Tips
On Caching
Something that is encouraged with a website is to use “caching”. Many great websites use this very effectively to decrease the site load time for a user. Site performance is paramount for us at Ethical SEO.. We like to make sure that our client’s websites aren’t just getting found but can be used as well. What many don’t understand is that you cannot simply load a caching plugin and expect a better site performance. The plugin needs to be configured for the site and the hosting.
Also, don’t just read this post and go add a caching plugin to try and configure it. Since a caching plugin is used to deliver website information faster to a browser it is normally very involved in the database. If you remove the plugin the conventional way it may cause some errors on your website. This often depends on the host you have. Just be aware that most caching plugins have code written in your database and it is hard to just delete. Make an educated choice about adding this to your website.
Use WordPress SEO. PERIOD.
WordPress is a very SEO friendly CMS and the perfect complement is Yoast’s WordPress SEO Plugin. This is probably the “heaviest” plugin I use on websites but it is worth it. They have done an amazing job of giving WordPress websites a search engine optimization dashboard. You can easily change and preview you page titles and meta descriptions for the search engines, configure your sitemap (oh yea it generates those too) and so much more. If you fully configure this plugin your website will be extremely optimized. Obviously this can be a good amount of work because you need to configure each page. Additional features include being able to write canonical tags, redirects, access to robots.txt and .htaccess(if applicable), permalink settings, social markup and most recently, bulk changes of title and meta description via WordPress SEO. The abilities it gives you are really too much to ignore. If you aren’t using it with your WordPress, get it downloaded.
Contact Form Catch All
This is something that is often overlooked and I myself have made the mistake to not have a catch all to contact forms. Missing any contact because of it being caught in your SPAM folder or just not being sent to the right place is unacceptable. Your customers need to be able to communicate with your business or blog. Make sure to check your contact forms and have a catch all for your messages in the worst case.
There are a lot of addons to contact form plugins, but by far one of the best comes straight from one of the better contact form generators out there and integrates seamlessly. Flamingo is a barebones CRM and provides a catch all for any message sent through contact form 7 . Also, I know that Gravity forms uses their own database; great plugin to use as well. These are a few examples but there are many that can do the trick and make sure you are getting every message sent.
Comments & Spam Prevention
If you have a WordPress you can understand how unbelievable the spam can sometimes be through your comments. Personally I get tired of getting them on my own blog and I decided to change my comments out from the default WordPress comments. Below I’m going to give you the two options that you can use for WordPress comments which will reduce the amount of comment spam you recieve.
Reducing & Managing Comment Spam
The easiest way to reduce and manage your comment spam is to use Akismet. This is downloaded by default on a WordPress installation and for good reason. It helps to manage your spam. All you need to do is go and sign up(for free) with Akismet and get an API for your website. Take that API and put it into your plugin on your website you will be almost annoyingly prompted to sign up. This will delete spam comment after 30 days and allow you to quickly filter out spam comments. It isn’t perfect for catching all spam but it is a helpful tool for managing your comments.
Change out your Comments
Changing out your comment platform will reduce your spam comments to zero. I know I’m about to suggest yet another plugin for your WordPress website but there are two I have taken quite a shine to over the years. I recommend using either Diqus comments or Google + comments. These aren’t the only good plugins out there; for replacing WordPress comments you can use Facebook as well. The reason your spam goes away is because they must have an account or login to post a comment. Disqus is very easy to use and Social comment replacements are great for having users not only active on the site but on your social channels as well.
Internal Search
If there is one thing that isn’t great with WordPress it is the internal search. Users normally use this to help find exactly what the need from a website. For a blog the search works fine; for a business it is a good idea to upgrade to something a little more robust and effective.
To solve this problem Google’s custom search engine is probably the best solution. There are two versions of Google’s CSE; free(with ads) and paid($100/year). Who better to get search results from for a website than the company that does it best. I will probably do a follow on how to best implement this recommendation for changing your internal search, but if you follow Google’s Directions it isn’t terribly difficult.
Using Tag & Categories
Probably one of the most helpful portions for SEO is how to handle your tags and categories. The reason I am such an advocate for WordPress SEO as a plugin is it solved a problem we had years ago when we first started using WordPress; tags and category creating duplicate content.
WordPress Tags
If if used incorrectly tags can create crazy amounts of duplicate content and and destroy a website’s crawl budget. Having a clean and concise website to crawl is important to Google and this affects the crawl budget allocated for your website. To use tags correctly you must have structure to what you are posting. Too often are there unique tags for every post, and this leads to the post being duplicated across every unique tag with little to no unique value. For bloggers these aren’t a bad user experience in a tag cloud, but to Google’s crawl bots this can be very confusing and dilute the pages you do want ranking.
Tags on most websites should not be indexed by Google or other search engine. Make sure this is reflected in your configuration if you do not have the structure to support the tags properly for the search engine.
WordPress Categories
This is a great and wonderful way to organize your posts, however for businesses it can affect your inbound leads more than you might think. Most personal blogs will never have any issues of having categories crawled. Reason being, they are likely not cannibalizing any terms that they may be wanting to rank for in the search engines. Check your categories and see if they are cannibalizing at all, if they are, it might be best to not index your categories via WordPress SEO.
For both the tag and category configuration this DOES NOT affect the posts being indexed, it is only the tag and category pages that are affected.
WordPress Wrap up
Whew, that was a lot of WordPress, these are tips that can help you for any WordPress website. As one of the most robust and used content management systems to use, you might as well get the most out of the platform. If you have any questions feel free to send and email over or comment on the post, I am pretty good at getting a quick response.