 Nothing is more essential to the work of an SEO than auditing. We begin every engagement with a comprehensive SEO technical analysis. We call it an audit. Below, we’ve given away our audit process so that you can do it yourself. If you don’t have the time or energy, or simply prefer to have experts do the work, give us a shout.
Essential SEO auditing tools
 Google Analytics (free) – In order to improve a site’s performance, you’ll need to first understand it’s current performance. Google Analytics data will provide critical insight into the strongest and weakest page of your site.
 Google Webmaster Tools (free) – This tool is particularly important for evaluating indexation and accessibility issues. GWT also contains sub-tools such as page speed testing, structured data testing, and fetch as Google.
![]() ScreamingFrog SEO Spider (free version, paid upgrade) – ScreamingFrog is a tool that crawls your site just like GoogleBot, and then spits out all of the critical SEO information about your site. This is perhaps the most critical website auditing tool. There are others like it, but ScreamingFrog is the best.
ScreamingFrog SEO Spider (free version, paid upgrade) – ScreamingFrog is a tool that crawls your site just like GoogleBot, and then spits out all of the critical SEO information about your site. This is perhaps the most critical website auditing tool. There are others like it, but ScreamingFrog is the best.
 MajesticSEO or Ahrefs or Open Site Explorer, or Link Research Tools (free versions, paid upgrades) – These are all tools that report on your site’s inbound links. These are all fine tools. I prefer MajesticSEO for sites with small amounts of links. For the most power and flexibility, LinkResearchTools is what you want, but it’ll cost you.
![]() Excel (paid) – No brainer. You’ll need Excel to organize and explore important website data. However, you don’t have to be an Excel wiz in order to perform an effective SEO audit. A basic understanding of the program is all you need.
Excel (paid) – No brainer. You’ll need Excel to organize and explore important website data. However, you don’t have to be an Excel wiz in order to perform an effective SEO audit. A basic understanding of the program is all you need.
Other tools you might find handy
- Siteliner – Helpful for identifying internal duplicate content
- SEMRush – Helpful for competitive keyword research
- URIValet – Helpful for page speed analysis
- Coffee – Helpful for brain.
Ok, you’ve got your tool box filled. Let’s get to work.
1. Pre-Audit Notes
We start every audit by taking notes on the overall performance of the site. For this portion of the audit you will need the following tools:
- Google Analytics
- SEO Intuition (if have not developed any SEO intuition, we’re happy to help)
a. Create Annotations for Major Google Algorithmn Updates
The annotations feature in Google Analytics allows you add major Google algorithmn events so that you can attempt to correlate those events with changes in organic search traffic.
Here are the dates of the “major” Google Algorithmn events since 2011.
- 02.23.11 – Panda Farmer
- 04.11.11 – Panda 2.0
- 05.09.11 – Panda 2.1
- 06.21.11 – Panda 2.2
- 07.23.11 – Panda 2.3
- 08.12.11 – Panda 2.4
- 09.28.11 – Panda 2.5
- 10.05.11 – Panda Flux
- 11.03.11 – Freshness Update
- 11.18.11 – Panda 3.1
- 01.18.12 – Panda 3.2
- 02.27.12 – Panda 3.3
- 03.23.12 – Panda 3.4
- 04.19.12 – Panda 3.5
- 04.27.12 – Penguin
- 04.27.12 – Panda 3.6
- 05.25.12 – Penguin 1.1 (#2)
- 10.05.12 – Penguin #3
- 01.22.13 – Panda #24
- 03.14.13 – Panda #25
- 05.22.13 – Penguin 2.0
- 07.19.13 – Panda Recovery
- 10.04.13 – Penguin 2.1
- 05.19.14 – Panda 4.0
- 07.24.14 – Pigeon
- 09.23.14 – Panda 4.1
- 10.17.14 – Penguin 3.0
If you need some background on each of these algorithm changes, Moz created a really useful timeline with descriptions of each change and links to relevant articles.
Note: There are tools which help automate the process of setting your analytics data against the major Google updates. However, I always prefer to enter them manually as annotations in GA because 1) I now have those annotations in my Analytics view permanently, and 2) it helps me memorize when big Google events happened which is helpful as I move forward with the analysis.
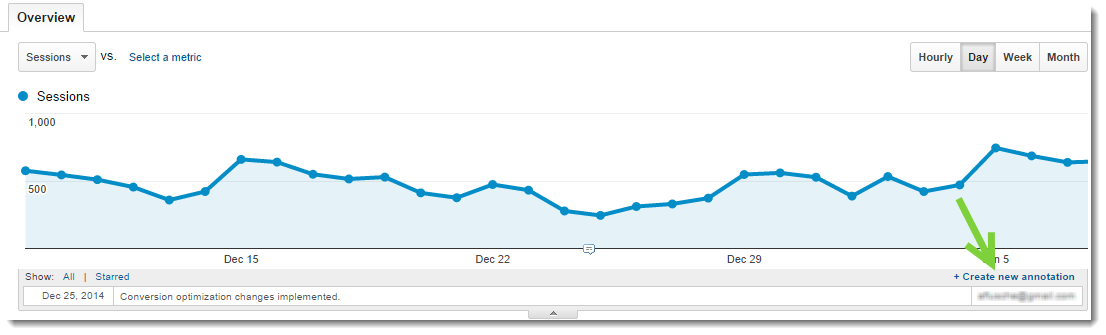
How to create an annotation in Google Analytics
It’s simple. A picture is worth a thousand words:
b. Evaluate Organic Traffic Trends Over Time
Now that you have your annotations is place, filter so that you are only seeing organic search traffic, and set your date range back to January 1, 2011 (or as far back as you have data).
Here we are looking for any obvious correlation between the major Google algorithm events and significant traffic changes.
c. Compare Current Numbers to Previous Periods
Next, let’s compare our current organic traffic numbers to previous periods. Creating this visual will help us understand how much of an impact certain Google algorithm events had on the site’s traffic, which will help guide our proposed course of action.
Google Analytics makes it easy to compare one period to another. Pick out a date from your trend analysis which correlates with a major Google event and some significant change in traffic.
Set this date as your start date, and set your end date 6 months or so in the future.
Then, use Google’s compare feature to look at 1) the previous period and 2) the previous year.
As you can see, this site’s traffic is down x% from the previous period since Penguin and down x% from the previous year since Penguin.
Note: When you are performing this analysis it is important to keep in mind factors outside of Google updates, such a seasonality or major website promotion efforts.
d. Create Hypothesis
Now that you’ve gathered and analyzed some data, it’s time to make a hypothesis to explain why you site isn’t performing as well in organic search as you want it to.
For example, if you notice that your organic traffic consistently dropped in the wake of Panda updates, it is reasonable to hypothesize that there are on page factors that are preventing your site from ranking as well as it could be.
It is important to create this hypothesis based on your Google Analytics data because it gives you a place to begin your investigation.
2. Accessibility
Google’s bot (hence forth referred to as Googlebot) must be able to easily access your site’s pages in order to index them in search results, and serve them up for relevant queries. This is the perfect place to start our analysis: The factors that influence the accessibility of your site.
To perform this analysis, you’ll need the following tools:
- Google Webmaster Tools
- ScreamingFrog
- SEO Intuition (if have not developed any SEO intuition, we’re happy to help)
a. Indexation Checks
First, you need to know that your site’s pages, at least most of them, are being indexed by Google. There are two quick checks that you should perform:
1. Site Search in Google
Simply type site:yourwebsite.com into Google, and see what gets returned:
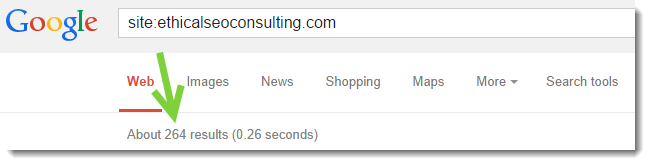
Google is telling us that there are 264 URLs from our site in their index. Now, taking what you know about your site, you can determine whether the number of pages returned as indexed should raise any red flags or not. The next step is to compare this number to the number of indexed pages reported up on in webmaster tools. Here is a good example:

If these numbers do closely match, or if there are substantially more indexed pages than submitted pages, you have some technical issues with your site. There can be multiple specific causes to this, but it comes down to having some type of error in your site architecture (unless a plugin is causing it). A good general rule is that the number of submitted pages should be roughly the same as your indexed pages, give or take few pages.
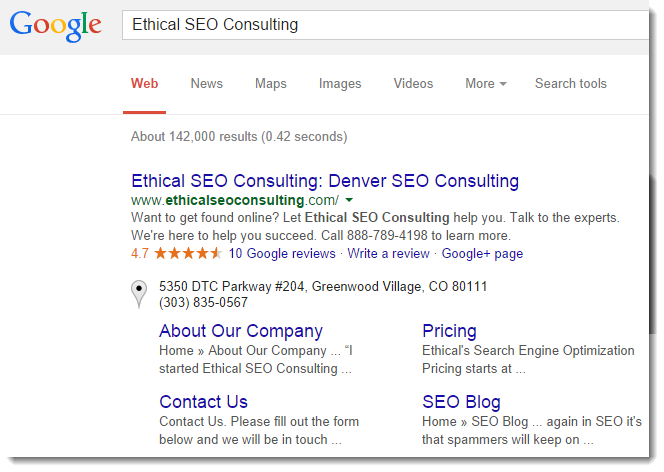
2. Brand Search
If your site doesn’t rank #1 for your brand name, there are likely some major SEO issues (unless, for example, your brand name was Lady Gaga, in which case you would be hard pressed to rank #1).
Simply search your brand name in Google. You’ll hopefully see your site’s homepage as the first result:
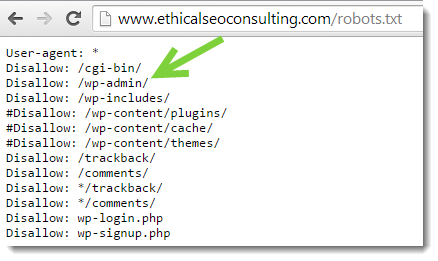
b. Robots.txt
Robots.txt is a file that gives search engines crawlers, like Googlebot, instructions for crawling your site. Using the robots.txt file, webmasters are able to prevent search engines and other bots from accessing certain parts of their site.
The robots.txt file is generally used for blocking crawlers from entire sections of a website. For you wouldn’t want to allow bots to crawl your website’s administrative back-end, so you would block those administrative sections:
If the robots.txt file is incorrectly configured, it can prevent important URLs on your website from being crawled and indexed by Google.
Here is an example of a robots.txt file which would prevent Googlebot from accessing any part of the website:

c. Meta Robots Tags
Where as the robots.txt file allows you to block entire sections of your site, a robots meta tag is normally used for blocking individual URLs.
By implementing the follow html tag in the head of any webpage, you can block it from being indexed by Google:

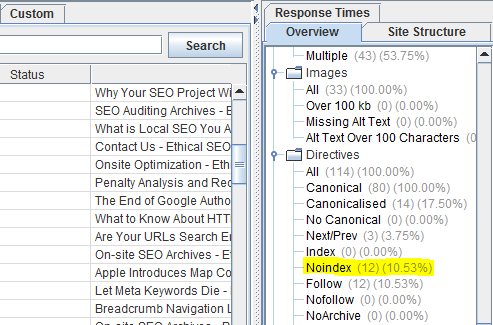
To check for pages on your site that contain the meta robots “noindex” tag, open up your ScreamingFrog crawl and examine the “Directives” section in the right sidebar:
d. HTTP Status Codes
When a human lands on a page with a status code error (404 error, 500 error, etc.), they can’t access the content they are looking for. The situation is no different for search engine bots. Accordingly, it’s important that your site contain as few pages with status code errors as possible.
There are two places to check for status code errors on your site:
1. Google Webmaster Tools
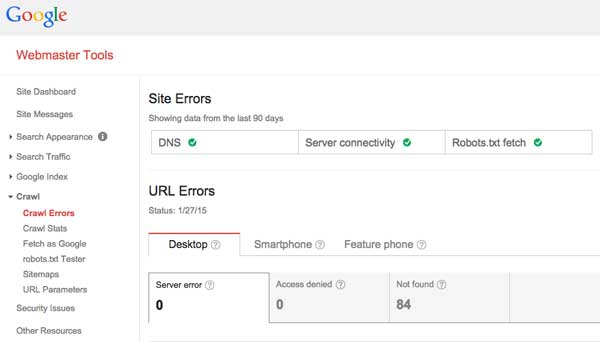
2. ScreamingFrog
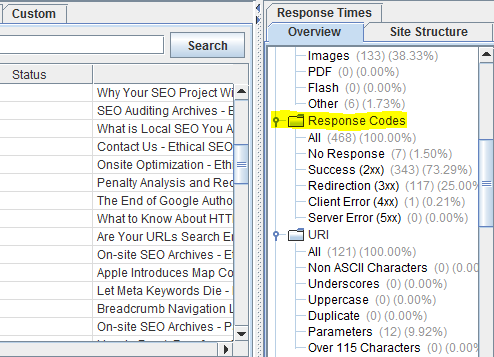
Once you’ve identified all of the URL’s on your site with status code errors, you can begin the process of fixing them.
e. Sitemaps
Sitemaps provide a road map of all the URLs on your website. Your sitemap should exist in two forms; XML and HTML.
XML Sitemaps
Google allows you to submit your site’s XML straight to their bot using Google Webmaster Tools. It is best practice to submit an XML sitemap to Google which contains only the URLs that you want Google to include in it’s index. Be sure that your XML sitemap does not contain any pages that return status code errors or duplicate/thin content pages that you don’t want making their way into Google’s index.
The best practice limit for URLs per XML sitemap is 5,000, and the maximum is 50,0000. Sites with more than 5,000 URLs should organize their URLs into multiple XML sitemaps.
HTML Sitemaps
HTML sitemaps are just as much for humans (if not more) as they are for Googlebot. Here is an example of an HTML sitemap.
HTML sitemaps help humans and Googlebot alike quickly find every page of your website. HTML sitemaps help webmasters achieve a flat site architecture.
f. Internal Linking
It is optimal to ensure that all of your site’s pages are accessible within three (3) clicks of the home page. This creates a flat site architecture in which pagerank flows efficiently from the top pages all the way down to the deep pages, and both humans and Googlebot are easily able to access all of the sites pages.
To check whether you site’s internal linking is optimal, reference your ScreamingFrog crawl, and scroll over to the “Level” column. If any pages have a level that is greater than 3 are not accessible within 3 clicks of the homepage and thus, are sub-optimal.
g. Page Speed
When webpages load slowly, it creates a bad experience for human. It also creates an inefficient experience for Googlebot. It is optimal for pages to load quickly; we shoot for less than 10 seconds at an internet speed of 1.5 mega bytes per second.
To check the load time of your primary pages, we suggest using URIValet.com. To see the load time at 1.5mb/s, scroll down to the “Time to Download” section, and look at the time which corresponds to 1.5mb/s:

If you’re load time is greater than 10 seconds at 1.5mb/s, head on over to Google’s PageSpeed Insights tool. Google will tell you the actions that you need to take in order to speed up your load times.
3. On Page Signals
Now that we understand how the site is being accessed by Google, and what we need to do to optimize that process, we can turn our attention to the on page factors that influence search engine rankings.
To perform the on page portion of the anaysis, you’ll need the following tools:
- ScreamingFrog
- SEO Intuition (if have not developed any SEO intuition, we’re happy to help)
a. URLs
The individual URLs that make up your website is the perfect place to start the on page analysis, as the URL is the gateway to your website’s content.
Best Practices
When you are analyzing the URLs that make up your website, refer to these best practices:
- URLs should be as short as possible (never longer than 115 characters). Compose your URLs as if the only way to ever get to them is to manually type in the address.
- URLs should contain keywords that clearly convey the topic of the page. Again, act as though the user has no other information about the page, and must understand the topic based solely on the URL.
- Most of the time, most websites should use subfolders rather than subdomains to organize content.
- You should avoid using parameters in your URLs. Here is an example of an excessively parameterized URL:
- Your URLs should contain hyphens NOT underscores. You should also use only lower case letters and avoid using special characters. Stick to letters and numbers.
https://studyabroad.asu.edu/index.cfm?FuseAction=Abroad.ViewLink&Parent_ID=61509DCF-5056-A035-EF8AEB6058D84EA0&Link_ID=18C3E78C-2004-C4F4-F5050F9718195A07
URLs and Duplicate Content
The URL is the entrance point to your website for both humans and Googlebot.
If there are multiple unique URLs which all contain very similar or identical content, then you have a problem we refer to as URL based duplicate content.
Most webmasters do not intentionally create duplicate content on their site. What is common however, is for certain features of a website to cause multiple unique URLs to have identical content. This can lead to Panda-related ranking issues, and is one of the most common problems that we see with medium to large websites.
Here are the most common sources of URL based duplicate content that we see:
- Blog tags
- Blog categories
- Content facets, filters, and categories
- Indexation of both -www and non-www version of website
b. Content
We have arrived at the content analysis. Please keep in mind that here we will be covering only the most basic content best practices. If you need to understand whether you content strategy is viable at a higher level, head on over the the Keywords and Content section.
When you are examining the content on your site’s pages that you want to rank well in Google, you should ensure the following:
- Pages contain no fewer than 200-250 words of unique text.
- The content is uniquely valuable to the target audience; it solves a problem.
- The content contains a variety of phrases that it ought to be ranked for.
- The content does not seem “stuffed” with keywords. It is written for humans first and foremost.
- The content is free of spelling and grammar mistakes, which diminish credibility.
- The content is highly readable.
- The important, optimized content is in HTML and not images, Javascript, or Flash (search engines have a hard time crawling text in these mediums).
c. HTML Optimization
Some of the most fundamental optimization elements are contained within HTML markup on your sites pages. Here are the most important items to look out for:
Page Titles
The page title is perhaps the most important on page optimization factor. It tells both humans and Googlebot what to expect from a given page of content. You can view an overview of your site’s page title situation in ScreamingFrog in the right sidebar under “Page Titles”.
The page title appears the the
section of your page’s HTML. Here is an example:<head>
<title>An example of the page title</title>
</head>
Your sites page titles should be:
- Written to both contain keywords AND compel the searcher to click. Humans first, Googlebot second.
- Short enough so that they are not truncated in search results (try the page title tester from Moz).
Meta Descriptions
Meta desciprtions will not help you pages rank better, but they are crucial for driving clicks. You can view an overview of your site’s meta description situation in ScreamingFrog in the right sidebar under “Meta Description”.
Google (usually) displays the meta description for a page in their search results like this:

Your meta descriptions should:
- Be no longer than 155 characters.
- Contain language that conveys the message of the content and inspires clicks (get creative!).
Heading 1 Tags
Every page on your site should have a heading 1 (H1) tag. This tag should contain the keyword phrase that you want the page to rank for, but as always, it should be written for humans first and foremost.
You can check your site’s H1 situation in the right sidebar of ScreamingFrog under the “H1” heading.
Images
There are many reasons that your pages should contain images that extend beyond SEO. But for our purposes, we’ll look at the optimization factors involving images that may impact how your pages are ranked:
- Alt tag: All of your sites images should have alt tags which use descriptive keywords. You can check this in ScreamingFrog in the right sidebar under Images >> Missing Alt Text.
- File name: You should use descriptive language when naming your image files. Make it intuitive by avoiding numbers and special characters, and by keeping the file name short and sweet (just like with your URLs).
- Image size: Large images take a longer time to load than small images. Images should be saved to be the proper size and should compressed to as small a file size as possible without compromising aesthetics.
4. Off Page Signals
When we talk about off page ranking signals, we are mostly talking about your sites backlinks.
When another website links to yours, Google sees this as a “vote” for your content. In order for your site to rank highly for competitive keywords, you must do more than simply get the on page factors right; you must also show that your site is popular and authoritative. This is where backlinks come in.
We aren’t going to go in-depth with the off page signal analysis here, but if you are interested in learning more about both evaluating your site’s link profile and building new links, head over to the link building section.
One other off-page that needs to be mentioned, however, is citations. Citations deal more specifically with local SEO, and you can learn more about it on our Local SEO page.
Conclusion: SEO Audits are Hard
What we’ve provided here is just an overview of our SEO audit process. If you would like to speak with one of our consultants about a potential SEO audit project, please feel free to contact us now, and we’ll be in touch soon.